One Foot Front Loop Transition
Our book of kite surfing is full of tricks and with every chapter we disclose something useful and new for you. This move is a bit of a classic from the archives. Please have a deep view on below sequence and picture steps, which will make it easier for you to do successfully.
- The Take Off.
Ideally your goal with a pop transition is to land it with a diving kite without the need to add a late kite loop, as the later is really just a way of saving a mistimed attempt. This means that you need to pop up off the water earlier than you think and pretty hard, as this is what’ll give you your height. You need to keep tension on the lines to support you and stop the kite drifting back too far, and you’ll need to keep the kite sat fairly still above you whilst you pendulum out and swing back to land.
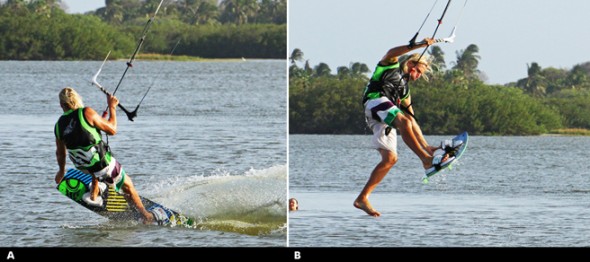
Pic A.
For his take off the rider has checked his speed by edging hard upwind, as if he comes in too fast he will swing too much. He has moved the kite up to twelve with his back hand centered on the bar and keeps the bar in to get the lift as early as possible before the kite gets to 12. As soon as the kite starts to pull the rider stamps down hard off his back foot and pops up and forward into his rotation, whilst already reaching forward for the grab (got to get the foot out early). Final point to note is that the rider does not yet turn his head for the rotation, as he doesn’t want to spin quickly as this will make the one-foot harder.
- Foot Oct
Taking your foot out quickly and effortlessly will help no end, so it may be worth loosening your strap slightly. It will also help if you’re accustomed to this action, so at least run through it numerous times on land, but better still have the one footed jump in the opposite direction nailed, as the movement is exactly the same as a tail grab one foot that way. Here it’s a nose grab, but realistically you should grab the heel side edge of the board somewhere between the strap and the fin. Hold the board up with your toes pointing skywards, and pull your foot out and down to avoid the foot sticking.
Pic B.
The rider is looking at his grab and the foot strap, which makes both taking the foot out and getting it back in quicker, and this is the main reason for not throwing your head around over your back shoulder on takeoff. If you feel confident try and push your foot down towards the water to straighten your leg for extra style points.
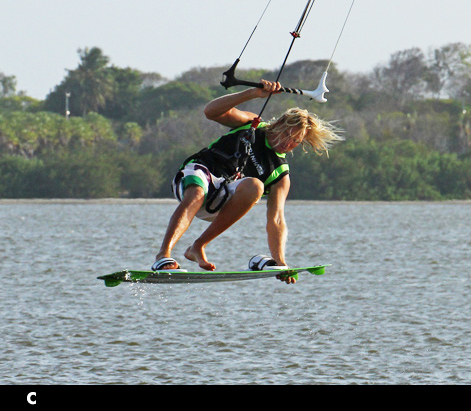
- The Rotation Pic C.
You can see in the photo that even though the rider is focused on the strap he is still rotating, although slowly, from throwing his shoulder down towards the nose of the board on takeoff. As soon as he feels his back turning towards the water it’s time to get the foot back is Even though the kite gives some hang, as a pop trick you won’t have much time in the air, so as soon as you turn past 90 degrees you’ll need to speed things up if you intend to land facing the right way with two feet in the straps. In this image the rider holds the board away at arms length, which gives hiss enough room to lift his leg and get his foot above the board, whilst looking at the strap and keeping the bar in for support.
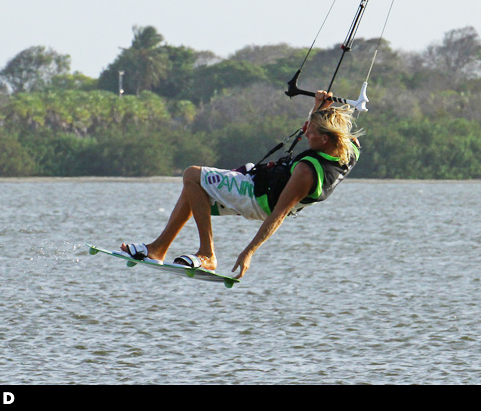
- Foot In Pic D.
There is no point in attempting to land until your foot is in, and as you can see here even though the rider is swinging out under the kite as a result of keeping the bar in his concentration is focused on getting the foot is It will be tempting to look around as you feel the kite pulling gently from behind you, but don’t be put off, get the foot jammed in and then you’ll be ready.
- Landing Gear Down Pic E.
As soon as his foot is in the rider releases his grab and turns his head and shoulders to look around towards downwind. At the same time he pulls on his hand to dive the kite, and as the power comes on it will pull his the rest of the way around his rotation and hopefully he’ll drop down into a perfect tail first landing.
As long as you he gets your head around and dive the kite the rest will be surprisingly automated. If the kite has drifted too far back in the window you will need to loop it as you land to stop you sinking!
Top Tips
- For your first attempts a bigger kite will make life considerably easier as it won’t move so quickly and it’ll give you a lot more float and therefore time to rotate slowly whilst you slide your foot quickly out and in.
- It will make a lot of sense to master the nose grab front loop transition first as then it is ‘just’ a matter of adding and timing the foot as opposed to learning a whole bunch of new skills at the same time
- We covered the grab variation in issue 31. Do make sure you give yourself plenty of space and some deep water, as at first it’s likely that you’ll let the kite drift too far, in which case you’ll get ceremoniously dropped into the water, which won’t hurt unless it’s only a few centimeters deep.
Common Problems
- The real issue on these pop transitions is kite positioning, and coming out with the kite high enough that you can dive it for power The opposite from perfect is the kite swinging back as you pendulum forward, resulting in you dropping in and the kite fluttering down at the edge of the window behind you.
- To counter this you must keep the bar in whilst you drift the kite up. Start with the kite no higher than 1 or 11, give it to jab up and pop immediately. You can let the bar out slightly at the apex but there is already enough to think about
– Kite not too high
– Pop Early
– 1 Foot immediately
– Foot In then turn head
– Dive and look down wind
Front Foot One Foot
This is really a fun of highest order. You’ll confuse yourselves at first, however be rest assured that the Triple “F” is astonishingly easy and is guaranteed to put a smile on your face – it is a show boating with a sense of humor. Now on serious note what do you need to bash out one of these? Practically if you can jump with a tail grab and loosen your straps you are good to go and actually ready to rock and pose.
Preparation
Get yourself prepared before you hit the water. To free your foot temporarily from the confines of your front foot strap you may want to loosen the strap a tad so that your foot can slide out, and probably more significantly back in effortlessly without hindrance or interference. And if you’re going to loosen the front one you best loosen the back one a touch too. With this way if you don’t get the front foot back in it’ll be simple to ditch the board pre splash.
Image-1 (The Jump)
If you’re not as quick as Flash Gordon getting some height and float from your jump is paramount so that you have time to grab the board and set free your foot, get it back in without stubbing your toe and then land . Preferably you’ll wish some power in the kite, a jolly good edge and some space. Start with your kite no higher than 11 or 1 o’clock. Once you know it’s there,
Look upwind and drive against your edge, pushing against your back heel ready to resist the extra power that you’re about to create. Now wiggle your front foot a little out of the strap so that it is not wedged in and send the kite hard with a decent pull push action, keeping the bar on the sweet spot. Keep edging, keep the bar in and wait for the kite to launch you. Only if you edge well and send kite hard you will get the up earlier and the kite won’t fly too far behind you, making it easier to focus on the task in hand. We’re looking for an elevator jump here, so more up and down, not flying at mach 10 downwind.
Image-2(Knees up)
 As with any foot out and board off you, need to get everything in position as soon as possible, so that you’ve got plenty of time. If you only manage to get the grab in on the way down your chances are getting slimmer. Here in this image you can see that straight away after take-off rider is getting his knees up towards him. This needs the most effort as the lift from the kite is straightening you out, so you’ll need to pull hard and its maybe why the rider in the picture doesn’t look too happy. Please have a look at his bar – he has pulled it in and also leveling it. This way he gets the kite settled just behind 12 o’clock with two hands before getting on with business.
Image-3(Look for the Grab)
Pay your attention on where you wish to grab the board, as this way you’ll get there earlier. Turning your head to look at the tail will also turn your body and the board, which is a good thing. By turning the board back you have more space behind your harness to lift your back knee and get the board closer to you. Lifting the back knee and the back of the board towards you tilts the board which aids un-weight your front foot and makes it easier to slide out. You can see that everything is happening behind the guy in the picture, so he has plenty of room to do maneuver
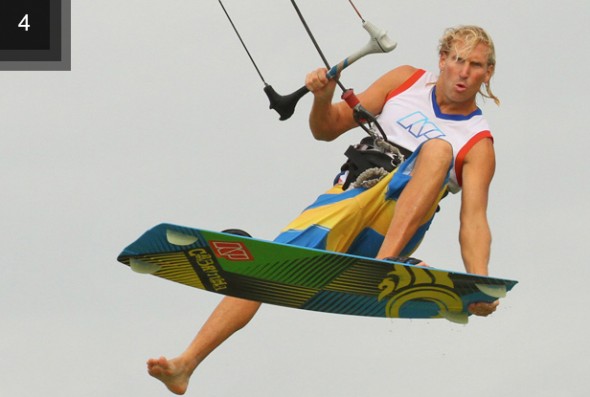
Image-4(Make It Count)
Of course! This moment is full of glory, so stoke it count. Once you have the tail of the board pull it up and in towards your bottom, as this will aid twist the board off your foot. At the same time lift your front foot towards you, your foot will now be dangling in told air. Keep your hold tight on the board and keep your bar in for float. From this moment you have a plethora of alternatives to show-off, the most significant of which is to get your front leg extended as the guy has in the images. As you get confident you can play with board angles and leg positions. As per any reasonably high and float jump, aim to keep the kite just behind at the angle of 12 o’clock so that you don’t get pulled forwards and off balance whilst in flight.
Image-5(Eyes and In)
 In the time when you are learning this, once you experience that you’re dropping it’s your signal for font foot in. This way you’ll have sufficient time. Once you get more proficient and confident you can wait until mill moments before landing. To make life easier and give you a bit longer you should start to pull gently on your front hand. This way the kite will fly at 12 o’clock and you’ll be satisfied with a little extra lift, and therefore time. If you don’t perform this, you’ll drop much quicker. Fix your gaze on the front strap and pull your back knee up, which will tilt the nose of the board down. Bend your front leg to bring your foot up and if your strap is loose it should be a fairly simple procedure. Once your foot is in give it a wiggle whilst you still have hold of the tail to make sure that it’s secure.
Image-6(Both Hands and Dive)
 Now all that’s left is to land this with panache and you’ll feel quite chuffed. Once your foot is in release the grab and get you back hand on the bar. You’ll need to dive the kite hard for landing because you gave it a little pull forward for support whilst replacing the front foot, so if you’re not aggressive now you’ll get pulled off balance as the kite flies around the edge of the window. You can see that rider is giving the bar a fair yank down to dive the kite and as it pulls he angles the board off the wind for a soft downwind landing.
Top Tips
1. Approach your first few attempts with an aggressive jump, a boned grab and a subtle look back to get your confidence up.
2. Then loosen the straps and give it a go.
3. You’ll be surprised how both the grab and the back foot act as anchor points, making this feel far more solid and controlled than you would expect.
Common Problems
- First off, struggling to get the foot out. Assuming that you have loosened the strap or straps the primary cause of this will be your legs. If you bring your front knee right up into your chest you’ll have no room to lift your foot out. Similarly if you don’t lift your back knee enough you may have the some problem.
- Make sure you get a decent tilted angle on the board, as this will make a world of difference.
- If you’re getting stuck looking back and then dropping down into the drink. Chances are that you’re being a bit ginger on the front hand and leaving the kite too far behind you after take-off. Remember to fly the kite back up to just behind 12 o’clock with two hands as you bring your knees up. Don’t go for the grab until you have the kite settled.
- When you’re having problems getting the foot back in it’s either going to be lack of time and height, so make sure that you pull gently on the front hand as you slide it back in. It could also be the knees again, so make sure the board is tilted.
Keystones
- Elevator jump
- Control kite with two hands
- Tilt board back knee up into chest and grab
- Pull board in and lift foot out
- Tilt, look at strap and slide foot in
This video shows how you can progress your jumps and not only to take your one foot of from the board but both feet and even flip the board! Practise and you’ll become the jumping king at your local kite spot in no time!

