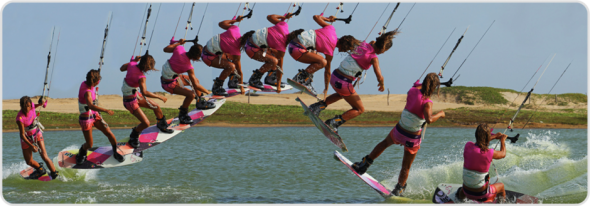
Popped Hooked Front Crail /Nose Grab
Making your move look good is an art and result of regular practice. The best key is whatever you do, do it with right way and follow instruction from professionals. Every professional kite rider has his experiences to share and valuable tips for new joiners. An amazing enthusiast this sport is and with that in mind here is our guide to a popped front roll with a Crail or Nose grab thrown into the mix for extra spice. The grab itself is done with the back hand reaching forward and touching, stroking or preferably holding either the nose of the board or as near as possible on the toe side way up near the fin. It goes without saying that you’ll already need a competent popped front to nail this beauty, as the more powered it is performed with, the better the axis of rotation will be and thus all the sweeter the grab will look. Let us remind you of a few vital key moments for a decent popped front whilst also sneaking in the grab.
Coming In
If you want pop you need to approach in the right way, as it will not only aid in getting up and off the water, but also the rotation and the landing.
In Pic A. the rider is perfectly set up for some hefty pop. With her kite parked just below 11 o’clock she pushes the nose of the board off the wind and flexes her back leg to flatten the board, increase speed and move towards the kite, allowing it to drop back a bit in the window. At the sometime she has all her weight, hips, head and shoulders dropped back over and behind the back foot. Her hands are centered and she has her bar trimmed in enough that she can get into this position without pulling too much tension onto the back lines. It is advisable to move your front hand over the middle of the bar, center line between your first two fingers if you can. This will allow you to keep the power on throughout the move without the kite diving down.
Take Off
Going into a popped front rotation it is all too tempting to drift the kite up and wait for something to happen, which will inevitably lead to a dangly and uncontrolled spin under a very high kite. It’s a most to keep the kite flying forward and get your height from a very aggressive pop. Breaking the pop and rotation apart, even just by a millisecond will make all the difference. If you concentrate on going up before throwing your head around and shoulders down you will get enough height. If you dive straight into the rotation you’ll not extend up and rather fire yourself down towards the water.
Pic B. shows the rider popping up hard. Having carved quickly back up onto her edge with her weight still back, she has now stamped down hard, pushing her back leg down against the edge of her board and extending her body upwards for maximum pop. She keeps her front elbow tucked in and bent to prevent the kite from drifting up and the bar is still angled towards the kite as if she were riding. The only give away showing a prospective front rotation is the bending and lifting of the front knee.
Rotate and Release
Once you know that you’re on the way up you need to get spinning and think about the grab. You won’t have long in the air so its chop chop. To initiate the rotation lean the head and shoulders forward, so that you are going with the pop. By lifting the front leg and allowing your body to be kicked up you will start to rotate from the back legs impetus. Turning your head to guarantee spin will help, but if you whip around too quickly it’ll be tricky to get the grab in early enough. As for the grab you need two actions, release the front hand and start to reach forwards, and you must bring the front knee up and across your body to bring the nose of the board within reach.
Pic C. the rider is just off the water and she already has her front knee up and across in front of her. She resists the temptation to pull her back leg up and keeps it straight – with it extended the nose of the board will tip even closer to her.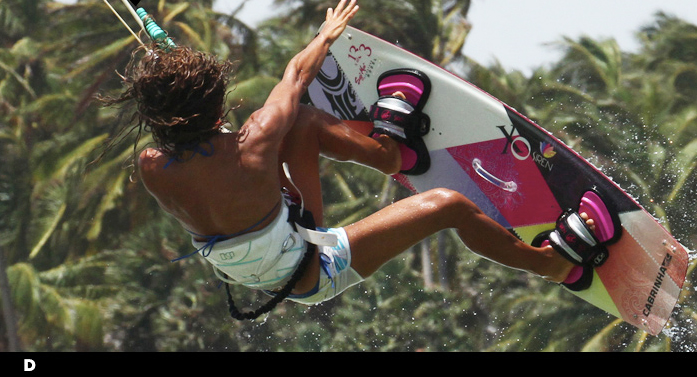
She allows her head and shoulders to tip down and forward into the rotation as she fully extends up and keeps the bar pulled in. Her back hand is reaching down towards the already well-positioned board.
The Grab Getting the grab in early has two advantages. The first is purely aesthetic, you’ll be able to hold it for longer and thus it’ll be more noticeable. The second however is more functional – once you have the grab you can pull the board in, making you small and then concentrate on getting around the rest of your front roll. Theoretically at least, if you get the take off right the grab should fall into place.
Pic D. As a result of all the hard work the rider has got a pleasantly satisfying pop, good height and controllable slow rotation. This allows her to get her hand onto the nose area before she has rotated 90°. Keeping the front knee up and releasing the back hand early were key.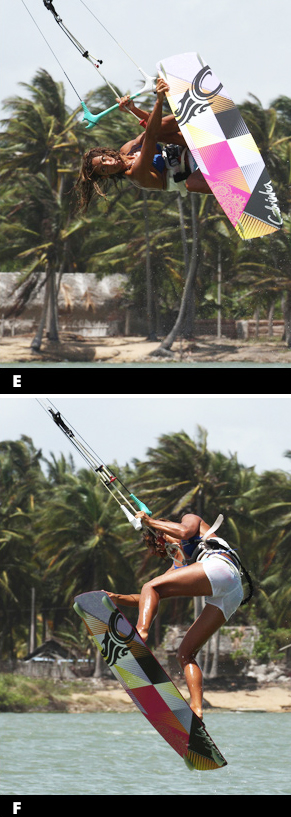 Keeping the bar in and power on guarantee that she won’t just drop out of her rotation, but will continue to be pulled forward. The Money Shot Once you’ve got the grab, hold it. As stated before, this isn’t just for poseur status, massaging your ego or blatant show boating, but with a solid hold of your board you can pull it in and turn your head and therefore finish your rotation.
Pic E. With her grab held the rider turns her head to spot the landing. To speed up her rotation she has pulled both knees up whilst still holding the bar in, keeping the kite moving forward and pulling.
Touch Down
Aim to hold your grab for as long as possible, until you complete the rotation. You’ll find the timing quite natural, as you’ll need to let go to allow your board to drop under you as you start to drop. Assuming you went off the wind in your approach you should come around to a comfortable downwind landing towards the kite, which will kill the power in the kite and make tutu comfortable stomped landing.
Pic F. You can see that the rider has released the grab and lets her legs and the board drop down beneath her for a solid reception. She still has the pulled in so will land following the kite with her weight squarely over the board.
Top Tips
- A good pop and confident front roll are key, so before throwing yourself up into one of these get warmed and ready with a few two handed front rolls.
- When you’ve knocked out a few high and controlled ones you’ll be more confident to go for the grab.
Common Problems
- If you’re struggling to reach the grab there are two solutions. Firstly if you can already nose or nearly nose (troll) grab the board in sent jumps or front rolls try popping with the kite higher, or even drift it up a tad.
- With a higher kite and a more vertical rotation it will be easier to reach the board. Secondly if you’ve never tried a two grab before and you’re finding it tricky here, revert to getting the body movement right in a sent jump and then a sent front roll.
Keystones
- Bear away with weight back for god pop
- Extend up fully
- THEN release back hand and start rotation
- Bring front knee up and across
- Hold grab and turn head
Kite Loop Handle Pass
The KL3 is a genuine pleasure to tame. Having a bit of pull from the kite and chucking a pass in to boot should get you cheering yourself on even without witnesses. Best bet before trying this would be to get your shifty 3 down, as that way you’ll be used to the rotation and muscle memory should prevail when you pull the trigger. For the more cautious amongst you, the progression step before this is the kite loop to wrapped, which we covered in Issue 21. It goes without saying, we hope, that at the very least you can comfortably and confidently stomp your unhooked fish polled kite loops!?
Approach and Pop
Perhaps a slight recap is necessary as your parting with water moment should be bang on to give you maximum hope of adding a pass and landing. Firstly you’ll need some height and therefore some up pull from the kite, not just some mad demonic downwind tug. Starting with your kite high, near as damn it to 12 o’clock will make all the difference. Trimming your bar down is also essential as not only will this make unhooking with your kite high possible, but it will also encourage your kite to loop, rather than spin on its axis. In Pic A. The rider has already set his kite at 12, flattened the board off to unhook with his hips up.
Lift Off
As you get launched into the air you must be ready for the put as the kite starts to turn. Having popped up hard you will be extended, but in order to take the power and still be able to rotate you must brace and balance yourself.
Pic B. As the rider explodes up off his back foot he puts all his effort into 2 things. Firstly he keeps his elbows in as tight as possible, so that his arms won’t extend too much as the kite pulls, which in turn will keep his body closer to the bar and ready for the pass. Secondly he pulls his knees up, making himself small, so that his legs and board don’t get left behind, and therefore have a chance of coming through and under the bar when he rotates into the pass. In short the rider is trying not to let his body extend into a Raley position. Flick and Kick those of you familiar with the shifty 3 will be aware of the spin that your back leg can create as it comes towards the bar for the pass. The KL3 is no different in that you’ll spin more quickly if you can “involve” the back leg. In fact here it is almost easier as rather than having to kick it out behind you, the whip from the kite will tend to flick your back leg out, so just concentrate on keeping the front leg in and your back leg will be poised and ready to strike.
Pic C. At this point the rider is watching the kite as it goes through the bottom of its loop and starts its journey back up. Keeping his elbows and front knee in the whip of the kite pulls him towards it, which conveniently flicks his back leg out, ready for the pass.
0 – 60!
As well as physical effort the timing of the pass will make or break this move. Although feeling is generally preferred, watching the kite during its loop is no bad thing as you need t “go” before the kite climbs back up in the window, as this will be the moment of least pull and the bar will be light and not pulling away from you. Pic D. As the turbo drops off, the rider pulls the bar down and back towards his trailing hip hard with both hands, so that his upper body comes up towards the bar.
Simultaneously he pulls and swings his back leg up towards the bar, which not only helps him lift the board but also generates the momentum for the pass. You can see how close his body is to the bar now.
The Pass
No rock& science here, as all the usual rules apply. Assuming that you went early enough the kite will not be pulling the bar away from you, so the key is committing. Therefore as your back knee comes through you must release your front hand and turn your head and shoulders so that you don’t block the rotation. Also you must hold onto the bar with you back hand until you can reach it with your free hand behind you. By holding onto the bar you can rotate around it, making the pass more achievable.
Pic E. You can see that the rider has twisted the bar behind him, which allows his shoulder and therefore body to rotate further around, almost rolling around the bar. This makes the pass simpler as by rolling onto the bar, it places the bar easily within reach of the searching free hand. Hence the progression from wrapped, as realistically you are first wrapped in the air, before passing.
Claim it
Once you’ve passed the bar preparation for landing is key. You need the board underneath you and your head looking forward and held high, whilst keeping your arm in as close as possible so that you complete the rotation sufficiently to land with the board heading down wind. Pic F. The rider has dropped his under carriage so that he’ll land on the board. Chances are that this will not be the softest of landings, so he’s lifted his head so that he can stand up and take it, whilst his elbow holding the bar is bent so that his body will follow the kite downwind and complete the rotation.
Top Tips
- As is so often the way the fundamentals are key, so hammering out a few unhooked kite loops first will acclimatize you to the wind and more importantly the kites arc.
- Watch the kite and feel for the flick as the kite whips.
- This way you’ll be able to anticipate the dead point, where you’ll have the slack to pass. If you it for it you’ll miss the moment.
- It will make good sense to learn this with less power and build up from there. If you can nail a pass on a low fly by just before landing it counts and the consequences of it not working are just a splash.
- We won’t be adding any common problems for this move, as it is a matter of concentrating on the relevant skills and putting them together – a comfortable kite loop with an explosive rotation.
Keystones
- Pop early
- Elbows in, Knees up
- Pull bar and swing back leg immediately after whip
- Hold on with back hand to roll around bar
- Get upright for landing and hold in front arm
Beach Start From Two Feet
Many moons ago we covered the beach start where you anchor the board by putting one foot in a strap to stop it misbehaving and running off whilst you fly the kite. As effective a method as that may be, the launch can often be preceded by a game of hop scotch as you hop around on one leg waiting for the moment. Enter stage left the solution to a hopefully more dynamic and picturesque entry into the blue yonder, the beach starts from 2 feet. All the principals are much the same, bar the hopping, so let’s look at the ingredients separately.
1 Preparation Pic A.
How deep you need to start will depend on wind direction and space. Ideally you don’t want to be any deeper than just below the knee, with half way up your shin giving you a good balance between a soft landing if you get it wrong and an easy enough spring onto the board. We’d highly recommend not learning this in onshore conditions unless you have a lot of space down wind, and avoid rocky bottoms, sea urchins, mussel beds etc. and a crashing shore-break, you get the picture. We can see that the rider is carrying the board in her back hand whilst controlling the kite with her front hand. This way she can position the kite just behind her, in this case around 12.30 to 1 o’clock before she drops or places the board down, so that the kite is primed and she has the bar in with tension on the lines – this is your ready position and if you adopt it as you enter the shallows you’ll avoid all sorts of fifing around, swapping hands, repositioning the kite, dropping the board and generally getting out of shape as you rush to get ready. Also if there are waves, with the board in your back hand you are not in danger of getting hit by the board as the waves push against it.
2. Drop It Pic B.
Before dropping or placing the board on the water, make sure that you have your back into the wind, so that you know the wind is coming from directly behind you, as this will help get the board in the right place.
You can either drop or place the board in front of you. Dropping it has the benefit of being quicker and you can get the board further away from you. In the photo the rider has dropped the board in front of her so that it lands heel side edge first, which means that it’ll stay at the same angle whilst not stopping right in front of her. The board should lie across the wind, or ever so slightly up wind, but definitely not pointing off the wind. This means that you’ll have a solid platform to land on and the board will not be right next to you so that you’ll trip over it or fly past it whilst learning this if the board does skew off at the wrong angle you can push either the nose or tail to get it positioned correctly. However once you’ve got it sassed you’ll want this to be quick and dynamic.
Here the rider has already started to pull on the bar with her front hand to get the kite moving as soon as she has dropped the board. This way there is no time for the wind or is wave to move the board before she’s on it.
3. The Jump Pic C.
The idea is that you use the lift from the kite to float you up the few centimeters and support you whilst you slot your feet is You are not trying to launch yourself up and acrobatically land on the board from a great height. By moving the kite across the window from behind you, 1 o’clock to 11 o’clock, the principal is the same, but gentler than a water start – the kite will lift before pulling you forward. Now with two hands on the bar and tension on the lines, the rider keeps pulling forward and waits to feel the lift from her kite. As the kite lifts the rider pulls the bar in more and springs up with the emphasis being back foot up first, as this one should be the first to land on the board to keep the nose up. The whole time the rider is looking at her straps, so that she can aim her feet into them.
4. Contact Pic D.
When landing on the board, although the rider will get her back foot in first to stop the nose from sinking, she aims to keep her weigh central, as this way the kite will support her and keep her balanced. If she was to lean back against the kite or towards the back of the board she will slide the board away from her and dip her derriere in the water. You can clearly see that she has not gone for height, as she still needs to lift her knees to get her feet into the straps. As is result her feet, knees and board are in front of her and between her and the kite, so she can dive the kite with her front hand and use the pull to move forward and not get catapulted over the board.
5. Accelerate Pic E.
The final piece of the jigsaw is to casually ride away without sliding or tripping. For this you will need power, so as soon as you know/feel that your feet are in you will need to dive the kite harder from the previous lift stage. It’s almost two separate moves, the 1 to 11 movement to lift and support you, and then a dive from 1 to drive you out. To take this power you’ll need to drop your weight both upwind and back whilst pushing the board off the wind so that you can then carve onto your edge with power rather than sliding sideways with your weight on both feet.
You can see that the rider has dropped her weight low, moved her hips back over her back foot and pushed her front leg out so that the board can accelerate on is flat surface whilst her kite dives. Once she is balanced the rider will it’s her head, shoulders and hips to look Upwind and drive against her back foot to carve the board up onto its edge.
Top Tips
- The best way to learn this beach start is to break it into 2 parts, firstly the lift, spring and get your feet in. The emphasis here should be to land comfortably with both feet in the straps and the kite supporting you.
- Without the dive you’ll then drop slowly back into the water, and as you do you can dive the kite to pull you back up. Once you’re comfortable with this you can then anticipate the drop and dive the kite earlier and earlier until you exit dry and relatively powered.

Common Problems
- The most common mistake is to start with the kite too high. If you start with the kite at 12 o’clock, the power will not come on until the kite pulls low and forward. The result is to get pulled across the front of the board, whilst manically attempting to lean back against the power, so you’ll either catapult over the front or have the board tea tray out in front of you as you fly off the back.
- Remember you need the lift to support you getting on, and then the power to move off.
- If you are getting the lift but still seem to be sliding off the back of the board, it’s the result of the board pointing too far off the wind.
- And finally if you keep dropping back into the water, regardless of what you do, make a point of focusing on what your arms and harness do. Your arms are just for steering the kite, and your harness should be taking your weight. If you hold onto the power through the bar you’re both unable to steer the kite or sit back into the power.
Keystones
- Kite just behind you
- Bar in front hand, board in back hand
- Drop board across the wind, pull kite up and over
- Go up with lift, back foot first
- Once in dive hard
Indy Pop to Blind
Before trying Indy pop to blind trick you must be reading well below instructions and practice it with right way. You can have every possible trill which is there in kite surfing. By understanding what to do and how to do can make all the difference.
And as we have often said it’s a great way to freshen up and reignite your passion fats move that you already have in the bag – so it’ll not only look the puppy’s but also feel do booth! Here we have a hooked in pop to blind with a back hand grab on the toe side rail in between your feet. You should already have the ability to pop around to blind and ride and if you don’t then hopefully this will be the incentive you need to learn.
The Set Up- Pic A
When you search for your pop you will require two things, the obvious one being speed with a dose of power and the less obvious one is a good body position, which is always much required. Whilst learning you can afford yourself the luxury of a third one, which is lift from the kite. No need to have it down at 45° when a forgiving 1 or 11 o’clock will help you on your way. Here we can see in the image that the body position as the rider carves back up into her pop. Her front leg is extended, meaning that her hips, and weight are pushed back towards the tail of the board and her shoulders are also leaning back. Surfer adopted this position before she turned off the wind and has held it throughout her carves. This very sturdy position enables her to pop explosively off her back leg. Before we continue take note that your hands should be centered on the bar and your kite parked still.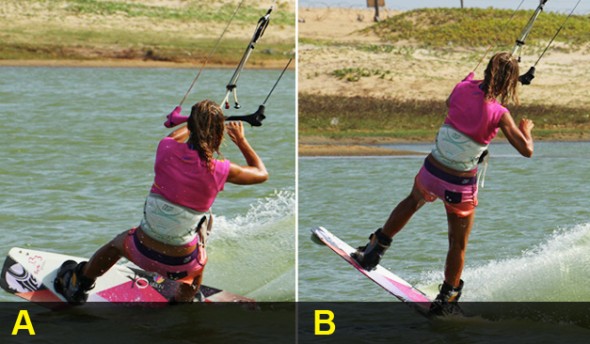
The Explosion Pic B
From such a solid set up the pop should be easy and simple. As long as you turned off the wind before carving up both the kite and the board will behave, that is to say the kite will give you something to pop against and your board won’t slow down too much as you carve. To get maximum pop you must keep your shoulders back and upwind of the board, your bum low and close to the water and you must not soften your back knee as you carve up. The rider has stamped down hard against the board with her back foot, explosively kicking herself away from her edge, and with her weight back and she takes off nose first. In anticipation of not having much time to grab she is already releasing her back hand from the bar as she stamps.
Board Up Pic C
As with any pop you need to wait until you’ve extended your body to get full elevation up, but as soon as you have it’s chop-chop to get the grab in. In picture, having already released hand, her next job is to bring her knees up towards her so that the board is within grabbing distance. The rider looks down towards where she’ll grab as she lifts the board and keeps her knees apart so that there is room for her arm to reach down towards the edge of the board. Also as a result of popping hard the back of her board kicks around and out slightly which has the effect of turning the rider back and away from the kite. This is good as it pushes which in turn gives her more room to reach down with her back hand.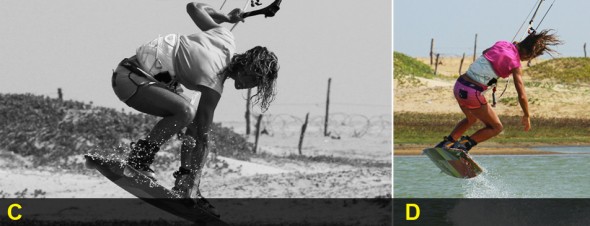
The Grab Pic D
With the board flicking around, roots for the back hand to reach down and the knees pulling everything up she can happily grab the board for a solid Indy. In this picture you can see the result of all that has gone before – the bar is in front of her and she has plenty of roots to reach and hold the grab without the need to be a contortionist. Whilst you have the grab sirs to keep the bar in on the sweet spot so that you’ll have a modicum of support from the kite, you’ll keep your forward momentum for the landing, and you’ll be able to dump the pull when you need to turn to blind.
Throw the Blind Pic E
A very good thing about the grab is that it naturally makes you stall your turn or throw to blind. Blind is always a last second movement, hence why we can do a by pop to blind. The higher you go, the longer you have to wait in order to keep your balance and control the landing. Once you feel that you’ve got the grab and you know that you’re coming data it’s time to turn. The action will come from your hips and your back leg whilst your free arm will balance you. The rider has released her grab and now commits to blind. To turn the board she twists her hips and pulls her back leg up towards her bottom and around towards the water. The board will naturally want to fall tail first so she focuses on pulling her back leg up. By doing this she will rotate around her harness hook and should make it all the way.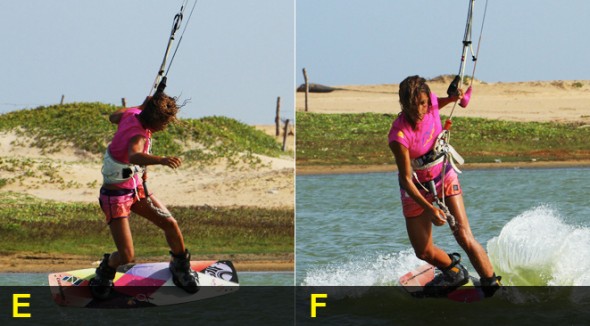
Landing Pic F
Landing this should be as per your pop to blind, though chances are as you’ve had more height you will have less momentum to keep you going once you plant the board. Make an effort to keep your back foot up so that you can plant the front of the board into the water for landing. This way as the nose catches the board will pivot off the wind more and you’re more likely to keep moving. If you land flat on your edge you’ll just stop. You can see that the rider has landed nose first with her front leg fairly straight, whilst her back leg is bent so that the board will turn further away from the wind on landing
She is already in her default blind position so that she will keep moving. If you have slowed too much pull the bar in to get some oomph from your kite.
Top Tips
- First of all you should practice the Indy if you never tried it before.
- Getting the board flicking you slightly around on take-off does make the movement of turning to blind in the air much easier as you have less far to turn and thus your body is in a better position.
- Try looking back at where you came from as you grab, this will help you turn during your Indy.
- Although we’ve said you don’t want your kite too low, don’t have it any higher than 11 or 1 o’clock. It still needs to be pulling forward to allow for some flick, an easy grab, and momentum on landing.
Common Problems
- If you can’t reach to the grab then ensure you’re popping hard enough. The pop will help you lift the board as the water will cork the board back up at you.
- Also make sure you turn to face slightly back to get the bar and your harness out of the way.
- If you’re falling backwards as you land. If your body is further downwind than the board when you land you need to sheet the bar out as you throw the blind.
- If you’re landing and then falling chances are that you’re landing flat or tail first, so concentrate on keeping that back foot up and close to your bottom so that the board can pivot.
Keystones
- Turn up and pop hard
- Release back hand and look for grab
- Lift board and look back
- Throw to blind using hips and back leg
- Keep back leg up to land nose first


