Front Roll Hand Wash Transition
Yes another hand wash. These moves are always popular crowd pleasures and on clinics everyone wants to get involved in some water tickling. This is the front roll or front loop variant and it has its roots firmly placed in the more traditional popped front loop nose grab transition from yesteryear as featured in Issue 31! There is quite a lot going on in a short amount of time, so you’ll not have the luxury or hindrance to worry about flying the kite, it’s more pop and go and until you’ve nailed a few the kite will seemingly dictate when everything happens. This is another move that will be far easier to learn on a bigger kite and much trickier on a 7m.
Your approach into this is similar to that of a dark slide or back roll hand wash if you already have those nailed. If not fret not, your principal aim is to stay low whilst maintaining your edge. Normally to pop we explode upwards and naturally as you sit you will bend your knees and come up over the board. So get your cheeks down low whilst keeping your edge. This way you’ll have an edge to kick up and off, whilst being low enough to get your hand in the water.
You can see the rider approaching with his kite about 11 o’clock, bar trimmed out so that he can keep tension on the lines with an extended arm, plenty of speed and he is sitting low but still with plenty of edge. From here the rider takes his front hand off the bar, turns further into wind to check his speed and very gently pulls the bar in with his centered back hand.
Kick Edge Pic B.
Timing wise your moment to go is the same in all these pop trick transitions, you must go early, that is to say before you feel the kite lift. As long as you pre-empt the lift your kite is less likely to fly too far back in the window and you’ll be able to stay low.
In Pic B. The rider really kicking off and against his edge, not up. This fortunately is the standard kick off fees forward rotation but here you must exaggerate the action. The rider leans forward and stretches his free front arm out in front of him as he kicks. This will both initiate the front roll and plant his hand into the water. It is important to get your hand out in front as you’ll soon overtake it without the resistance and drag it’ll produce once buried in the water.
Hand Plant Front Roll Pic C
Not a delicious Ionian snack but your next port of call. If you get your hand down on a straight and stiff arm you will rotate no matter what, as your hand becomes the axis for your rotation. This means that you can try and concentrate your efforts on your kite or rather your other hand, the one holding the bar. You need to keep tension on the lines by holding the bar in on the sweet spot, whilst trying your best not to send the kite steaming off behind you. Three things will help: hand in the centre of the bar, sweet spot trimmed out and big kite…
Here in Pic C. you can see that the rider kite has still not reached 12 o’clock and he is already well into the move. He has his hand in the water and is making an effort to resist by keeping his arm locked out. Simultaneously the rider keeps the bar in and as such the kite will be slowly drifting back whist The rider pendulums underneath.
Upside Down Pic D.
As mentioned earlier there is an element of just going with this move as you learn it. However if you can you should try and invert yourself as much as possible to get some extra style points. You’ll see some folk banging these moves out totally straight and stiff. As your head is down it is a matter of getting your hips, feet and board up, and the simplest method is to keep your hand firmly planted and straighten your legs. With the drag from your hand they’ll be forced up! You can see that the rider pushing his feet up in an attempt to get inverted. Worth noting though is that his hand is only just in contact with the water so he is about to lose resistance and his opportunity to get fully upside down. Whilst trying to straighten up the rider has to keep the bar in and be ready for the moment that he gets lifted and his hand releases from the water.
Is Dive & Land Pic E.
Once you feel yourself lifted, this is your cue to finish your front rotation as the kite has passed through 12 and is effectively jumping you up off the water. If you can get yourself around, then you’ll be able to see where you’re likely to land and balance yourself against any awkward pull from the kite.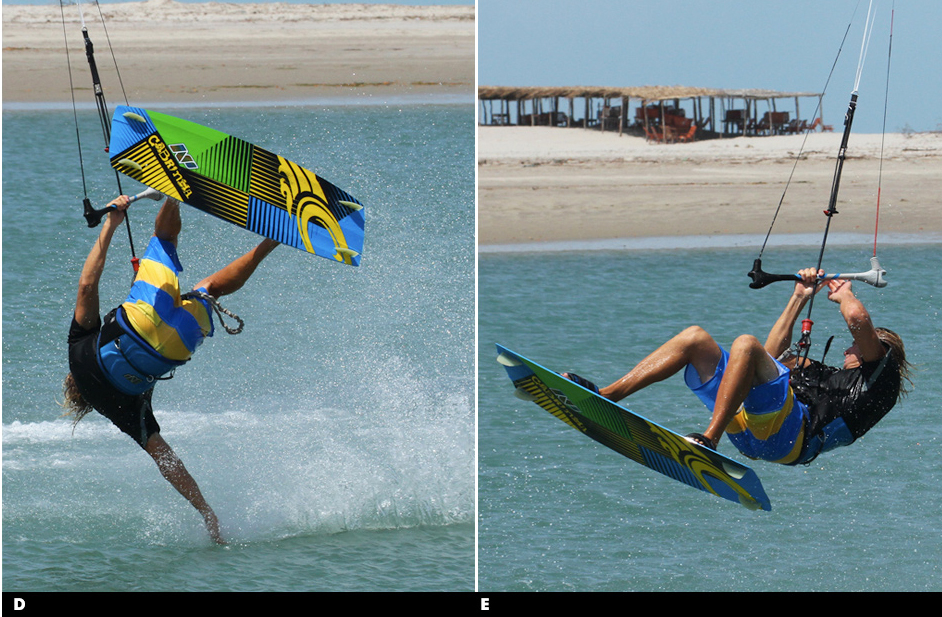
Looking at Pic E. you can see that the first two things that the rider has done are allow his legs to drop and get his free hand back on the bar, as both these movements will give him more control of the situation. By dropping his feet the rider has his undercarriage and landing gear down, and with two hands on the bar he can better control how quickly the kite is moving. The rider is also looking back and down wind, so that he can turn his body and board to where he should be landing. What he does now will depend on how far back the kite is and how far out the rider has pendulum. If the kite is still relatively high the rider will dive hard with his new front hand (the right one) to pull himself out of the move. If the kite is quite far behind the rider will have to dive it harder, aiming for a late kite loop, so that he’ll have the power to keep moving once he lands. Whilst learning this we recommend that you go for the first diving option, as it’s better to get wet and water start than get thrown around backwards.
Top Tips
- It’s a good idea to start off with some gentle popped front loop transitions with both hands on the bar to ease you into the kite timing and see how far back the kite goes.
- If it is going a long way back go earlier.
- Once you feel confident get low and give it a go, not much can go wrong as you shouldn’t be more than an arm’s length off the water.
Common Problems
- Main problem that you’ll have is the kite ending up too far behind you, so go early and keep your edge whilst you get low, and let the bar out a bit to stop the kite drifting too much.
- You may also have trouble getting the hand in and keeping it planted in the water. Really reach forward and throw yourself down into the water.
- Once it’s in resist the pull against it. This may take a few goes to get your head around.
Keystones
- Get low but keep your edge
- Release your front hand and kick forward early
- Reach your hand forward and down into the water
- Resist and try to straighten your legs up
- As you lift drop legs and turn to dive
Twin Tip Duck Tack
A rather fun transition, the love child of two moves! You could look at it as the twin tip variant of the directional duck tack, but equally it is essentially an on-water, or un-aerial back loop transition. In its own right a smooth way of changing direction and a possible method of learning the key movements to the duck tack before venturing out on your surf or race board. Technically on a twin tip with straps, the mechanics of this move are not overly complicated, however the timing is crucial so once you get the movement, pasting it together piece by piece will deliver the goods. The end result should be a carve up and through the wind of almost 180° degrees, so that your board is across the wind with you facing upwind, followed by a pivot on the nose of the board to turn you and the board the remaining 180°, before you ride off back from whence you came – simples!
The Carve
You need to get the board a long way up into and through the wind so you’ll need some speed. However don’t come blotting into it like a bat out of hell, rather start on a good upwind edge, kite just above 11 or 1 and then momentarily sit down slightly so that your board flattens and picks up a little bit more. To be able to carve all that way you don’t need anything fighting you, whether it is the kite pulling you back downwind or the board dragging through the water. Therefore you need to get your weight, think hips and shoulders, more forward so that you use all the board to carve – the sitting slightly helps with this. If you’re low and have weight on both feet, the board won’t bog and drag, but instead whizz around. To go all the way you must get the kite up to 12 o’clock, so pull gently on your back hand as you approach. And finally to prevent the kite from holding you back you must let the bar out to get rid of the power as the kite moves up.
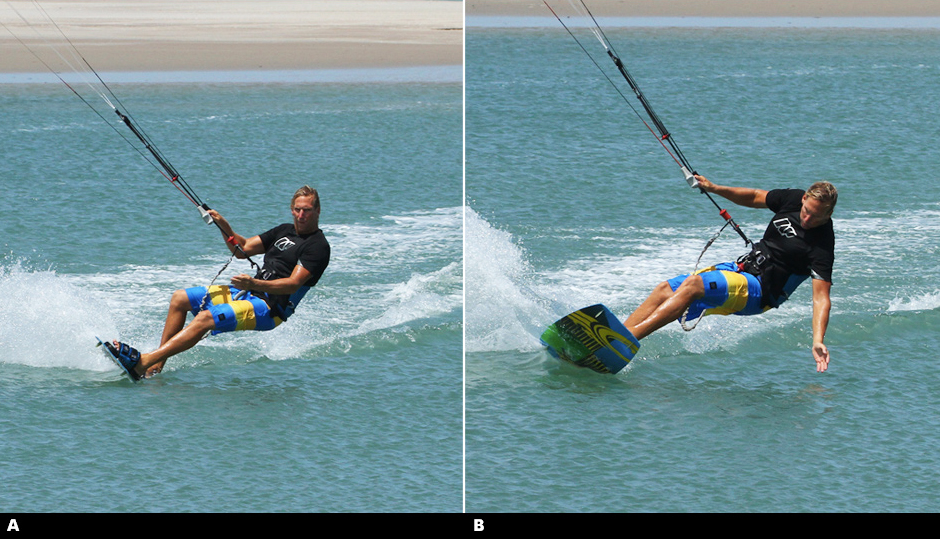
Pic A. The rider is carving into the wind whilst drifting the kite up to 12 o’clock with his back hand. He has taken his front hand off the bar, which allows him to twist his head and shoulders further upwind and let the bar out as the kite lifts. His front knee is slightly bent, and as he pushes his back foot away he breaks at the waist to keep his body upright. With weight on both feet you can see that his entire edge is in the water.
Half Way
Carving all the way until you are literally across the wind will place you in the perfect position to complete the move. As you can imagine once you’re here you won’t have any time to think before you gracefully sink back into the drink. The good news comes from 2 things. Firstly if you have got the kite up to 12 o’clock with the bar sheeted out, it will have flown all the way to the edge of the window, so therefore be right above you, waiting to support you. Secondly if you have carved hard, there will still be resistance against the board as it turns back towards you. This means that you can pull the bar in and push against both feet for support.
Pic B. You can see that the rider has carved all the way on the edge. With the board banked over and the kite high the tail does not slide, which would move him away from the kite. As Christian comes around past the 180° mark he pulls in on the bar and moves his weight forward, bending his front leg and pushing his hips towards the nose of the board.
Dig In
Assuming that you’ve got this far now is the time to get dynamic. Your sits is to dig the nose of the board into the water, throwing your weight over it and your front foot, whilst pulling in on the bar and turning your head and shoulders. As the power comes from the kite the resistance from the front of the board should be enough that the kite will pull you around.
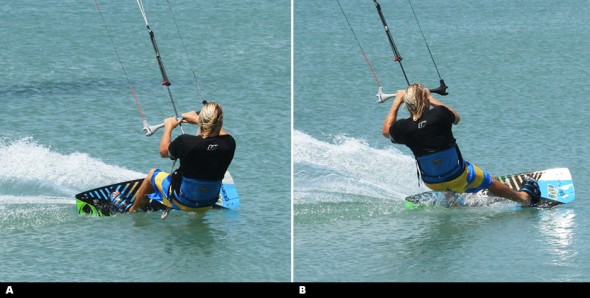
Pic C. With the kite above him, the rider pulls down hard on his bar hand whilst throwing his weight forward onto his front foot. At the same time he turns his head down and around to sink the nose and lift the tail – the rest depends on the kite.
And Around
When the power from the kite arrives you need to be in the previous picture’s pivoting position. If so the kite will lift you up from the water and then pull you off downwind. If however you don’t get your weight forward and therefore have too much of the board in the water the kite will lift you off the water and you hopefully land a couple of feet downwind and sail away.
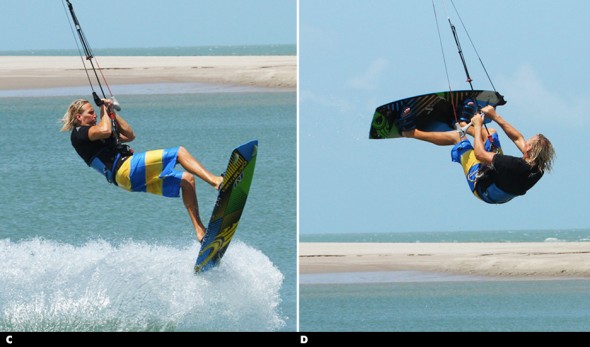
Pic D. With the bar held in tight, the kite has lifted the rider and he is now up and over the board. With all his weight pushed over what was his front foot, he leans back against the pull of the kite and allows it to pivot him around the sunken nose. To stoke sure that he doesn’t get pulled onto his face, the rider locks out his front leg, which will force the board to follow the pull from the kite.
Top Tips
- It’s worth trying to learn this in two stages. First work on getting your carve; as once this is in the bag you’ll be able to think ahead and throw yourself forward into the pivot.
- The carve must be just that, a carve any sliding and it’ll be goose over. So practice carving as far as you can, moving the kite up to 12 o’clock and letting the bar out as it drifts.
Common Problems
- Best start with the problem of sliding the tail out, as we’re all too proficient at this. If you are “loosing” the tail as you carve up it’s because you’re subconsciously going into slide turn mode.
- This means that as you carve you are bending your front knee so much that all your weight is over the front foot, which results in the tail sliding as you push the back foot away.
- Try to move your hips into a central position in between the foot straps, but no further forward. Also concentrate on edging the board so that you push through your back heel against the board, not your foot over the board. If you’re falling in downwind of the board, it will be because the kite is pulling you.
- Be sure to drift the kite up to 12 and let the bar out as you go. Also try to break at the waist as you turn so that your upper body stays upright. If you are falling onto your side as the kite pulls and board pivots around, make sure that you turn your head and shoulders to lead the pivot.
- Finally if you hop up and out of the pivot, it is because you have too much resistance, too much edge in the water. Make sure you get all your weight over the foot and roll back against the pull.
Keystones
- Drift kite up towards 12
- Release front hand
- Good solid carve off both feet
- Pull on bar, throw weight forward
- Lead pivot with head and shoulders
One Foot Front Loop Transition
Our book of kite surfing is full of tricks and with every chapter we disclose something useful and new for you. This move is a bit of a classic from the archives. Please have a deep view on below sequence and picture steps, which will make it easier for you to do successfully.
- The Take Off.
Ideally your goal with a pop transition is to land it with a diving kite without the need to add a late kite loop, as the later is really just a way of saving a mistimed attempt. This means that you need to pop up off the water earlier than you think and pretty hard, as this is what’ll give you your height. You need to keep tension on the lines to support you and stop the kite drifting back too far, and you’ll need to keep the kite sat fairly still above you whilst you pendulum out and swing back to land.
Pic A.
For his take off the rider has checked his speed by edging hard upwind, as if he comes in too fast he will swing too much.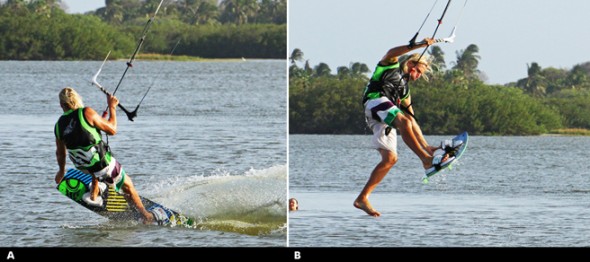 He has moved the kite up to twelve with his back hand centered on the bar and keeps the bar in to get the lift as early as possible before the kite gets to 12. As soon as the kite starts to pull the rider stamps down hard off his back foot and pops up and forward into his rotation, whilst already reaching forward for the grab (got to get the foot out early). Final point to note is that the rider does not yet turn his head for the rotation, as he doesn’t want to spin quickly as this will make the one-foot harder.
- Foot Oct
Taking your foot out quickly and effortlessly will help no end, so it may be worth loosening your strap slightly. It will also help if you’re accustomed to this action, so at least run through it numerous times on land, but better still have the one footed jump in the opposite direction nailed, as the movement is exactly the same as a tail grab one foot that way. Here it’s a nose grab, but realistically you should grab the heel side edge of the board somewhere between the strap and the fin. Hold the board up with your toes pointing skywards, and pull your foot out and down to avoid the foot sticking.
Pic B.
The rider is looking at his grab and the foot strap, which makes both taking the foot out and getting it back in quicker, and this is the main reason for not throwing your head around over your back shoulder on takeoff. If you feel confident try and push your foot down towards the water to straighten your leg for extra style points.
- The Rotation Pic C.
You can see in the photo that even though the rider is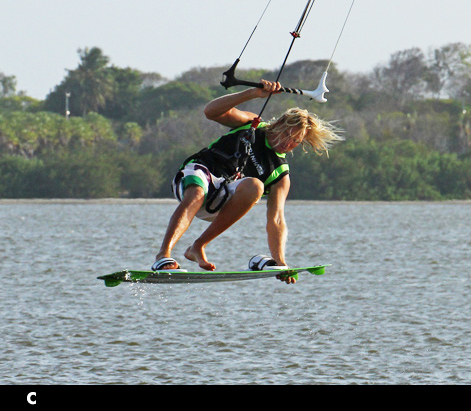 focused on the strap he is still rotating, although slowly, from throwing his shoulder down towards the nose of the board on takeoff. As soon as he feels his back turning towards the water it’s time to get the foot back is Even though the kite gives some hang, as a pop trick you won’t have much time in the air, so as soon as you turn past 90 degrees you’ll need to speed things up if you intend to land facing the right way with two feet in the straps. In this image the rider holds the board away at arms length, which gives hiss enough room to lift his leg and get his foot above the board, whilst looking at the strap and keeping the bar in for support.
- Foot In Pic D.
There is no point in attempting to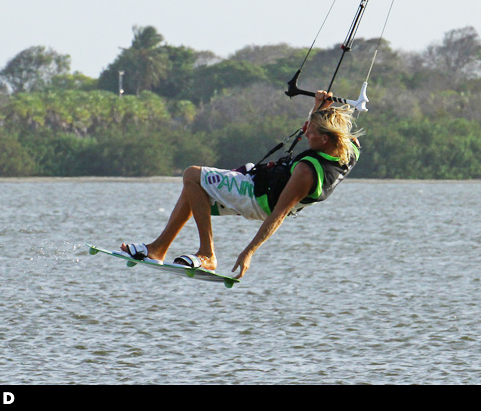 land until your foot is in, and as you can see here even though the rider is swinging out under the kite as a result of keeping the bar in his concentration is focused on getting the foot is It will be tempting to look around as you feel the kite pulling gently from behind you, but don’t be put off, get the foot jammed in and then you’ll be ready.
- Landing Gear Down Pic E.
As soon as his foot is in the rider releases his grab and turns his head and shoulders to look around towards downwind. At the same time he pulls on his hand to dive the kite, and as the power comes on it will pull his the rest of the way around his rotation and hopefully he’ll drop down into a perfect tail first landing.
As long as you he gets your head around and dive the kite the rest will be surprisingly automated. If the kite has drifted too far back in the window you will need to loop it as you land to stop you sinking!
Top Tips
- For your first attempts a bigger kite will make life considerably easier as it won’t move so quickly and it’ll give you a lot more float and therefore time to rotate slowly whilst you slide your foot quickly out and in.
- It will make a lot of sense to master the nose grab front loop transition first as then it is ‘just’ a matter of adding and timing the foot as opposed to learning a whole bunch of new skills at the same time
- We covered the grab variation in issue 31. Do make sure you give yourself plenty of space and some deep water, as at first it’s likely that you’ll let the kite drift too far, in which case you’ll get ceremoniously dropped into the water, which won’t hurt unless it’s only a few centimeters deep.
Common Problems
- The real issue on these pop transitions is kite positioning, and coming out with the kite high enough that you can dive it for power The opposite from perfect is the kite swinging back as you pendulum forward, resulting in you dropping in and the kite fluttering down at the edge of the window behind you.
- To counter this you must keep the bar in whilst you drift the kite up. Start with the kite no higher than 1 or 11, give it to jab up and pop immediately. You can let the bar out slightly at the apex but there is already enough to think about
– Kite not too high
– Pop Early
– 1 Foot immediately
– Foot In then turn head
– Dive and look down wind
Double Back Rool Transition
Adding together some extra rotation is a sure shot fire way of stepping up a move that you already have mastered, and the double back roll transition is definitely up there as one to learn, so here it is. Although some warning words are here, if you’ve been practicing the double back roll kite loop from last issue, you may require to rewire your brain and press default as these are two clearly different moves wherein you definitely don’t wish to be confusing. A very good base before starting this is a solid and controlled, BLT, or back roll transition if you’re from across the pond. From this point below is what you will be doing.
The Approach Pic A.
Vital 2 things to remember for any transition are; you have to kill some forward momentum and then you still need to send the kite for lift. You certainly require a good edge for both of these elements. From a good edge you can edge harder upwind to slow down, and with a good edge you can send the kite rapidly and sharply from either 11 or 1 to 12 o’clock because you maintain tension in the lines. If you think about this you won’t drift the kite up slowly whilst standing up on the board and your chances of success will be greatly increased. Please note and also see in Pic A that the rider has come in with good speed on a decent edge, kite at 11 o’clock, weight back and tension in his lines.
From this point the rider has sent the kite up whilst edging harder to both resist the pull, and also to slow down. Even though his back leg is bent it is not soft – it is pushing and therefore resisting.
The Rotation Pic B.
A certain element of trial and error with good amount of practice is what required for this part, depending on your standard BLT. In case if you are a recognized exponent of slow, casual-looking back roll transitions then speeding up the rotation to accommodate an extra 360° shouldn’t hold much of a problem. If however you’re guilty of the occasional foray into spinney quick low BLTs, then you’ll need to focus more on your approach and the take-off, in search of more height and float, which added to your spin speed should see you nicely round the full double.
We feel it extremely important to mention here that that you do want to help yourself into the second rotation, but you don’t want to force it as later in the move you can use your head, body and kite to help you finish. The rider I Pic B. has dropped his weight way back over the tail of the board. With his weight so far back the board will turn/carve much further into the wind as it is almost pivoting on its tail. This will efficiently speed up the rider’s rotation as he will carve further into wind before take-off than for his standard BLT.
The important tool here is timing, you must drop back as the kite starts to lift, a fraction before you take off. This way you’ll still edge and therefore be rewarded with some air and float. If you drop back too early you’ll be pulled back and the kite will fly further back in the window, offering you less time in the air to make it round the two times.
Take Off Pic C.
Here comes the key moment, though your approach will dictate how this goes. If you have edged and resisted and literally stabbed the kite back hard but face short time you will be able to pop up off your back leg as you pull the bar in whilst the kite is somewhere close to 12 o’clock.
The rider has pulled the bar right in after popping. The reasons for this are twofold. Firstly by pulling in hard with 2 hands the rider successfully stops the kite moving and keeps it centered above bias around 12 o’clock. Secondly he gets a cheeky bit of extra lift from the kite. However be cautioned if your sweet spot is trimmed miles away from you, your kite will flare/stall and you will not get the float or control that you’re expecting. As he takes off he keeps his head looking forward between his arms, which will stop him over cooking the rotation. Finally the rider in this image lifts his knees, making himself small, balanced and easier to rotate.
By the time you reach to the peak of your transition, your aim is to complete your first rotation, so one on the way up and then one on the way down. That means unless you’re getting great height there won’t be much time to separate the move into two halves.
You are ready and primed to go into number two as you complete the first 360°, it’s the most important thing here. Check images number D. that the rider has lifted his feet above him and has his knees pulled in close. This a little inverted position will make it much simpler to finish the move, as with your feet high and knees in, your whole body, legs and board will follow your head and shoulders as you turn into the second rotation. It is absolutely possible to finish the move with the board down low, however you are far more likely to finish with your head and shoulders, but find that the board has been left somewhat behind – which will hinder your smooth landing. In picture you can see that the rider has started to pull, gently at first, on his left hand (old back hand, new front hand – whichever way you prefer to think). This gentle movement of bar and kite will encourage you to lean back into the second rotation
Turn and land pic- E
Your second rotation will come from a combination of your head and the kite. With your feet up look around and you’ll continue to turn and the rest will follow. You can see that the rider is attentive on where he will land, and as soon as he feels that he is rotating, he dives the kite down hard. The pull from the kite twists him around and powers him up for a down wind landing.
One thing which really important is Timing here in this trick , but if you pull too early the kite will end up low with little power and as such you’ll be forced into a late kite loop once you have landed to keep you dry. If you time the dive well, you’ll get the perfect dry landing without needing to loop the kite.
Top Tips
- Start with some single BLTs, focused on the edge, send, upward take off and keeping the kite above you at 12 o’clock throughout the move.
- Once you’re comfortable, confident and consistent bring your feet up and go for the second rotation whilst keeping the kite at 12.
- Once this is in the bag you can dive hard to add the perfect 10 landing! If you’re struggling with the slow rotation, concentrate on the up rather than the spin and approach with less speed and more edge, whilst sending more aggressively – but just for a short moment.
Common Problems
- The most common problem here is implementation the move but landing with the kite so for at the edge of the window that there is no way to get any power to get moving.
- There are two probable reasons for this. Firstly you’re drifting the kite up rather than sending, so you feel the lift late and the kite has already travelled too far behind you.
- Secondly as you take off your leaning back onto your back hand, so you don’t stop or even redirect the kite to 12. Concentrate on performing the move with the kite at 12 o’clock and then add the kite dive on at the end.
- The other famous problem is not having enough height to land cleanly, so you are completing the double but always landing on an edge across the wind with your burn in the water.
- This can generally be linked with concentrating too much on the rotation and not launching yourself up into the move. Make an effort to pop up into the rotation, and not just carve around into the wind.
Some Keystones
- Good solid edge with legs resisting
- Send kite positively with confidence
- Pop up into the back roll and center bar
- Keep Kite at 12 o’clock and lift legs
- Turn head at apex and dive kite to complete number two
Toe Side Double Front Loop Downloop Transition
Your box of tricks should be always full with surplus of moves; however you have to ensure that you keep up with the transitions too. Having more ways to change direction is never a bad thing so here is another one which will have you flying out gracefully with plenty of beans. When you start doing this we will definitely recommend a controlled front loop from toe side and solid down loop. Let’s have a quick idea at a few pointers that will hopefully make the learning a tad simpler.
The Approach Pic 1.
A huge height is not required for this, however some forward momentum and plenty of float is obligatory, so you’ll need to approach this more as a double front roll with speed and the kite parked at either 1 or 11 o’clock. You’ll be taking off from your toes and therefore trim is important, hence get your sweet spot down towards you. This way you will provide a decent committed edge and still have room to send the kite without stalling it. Your toe side stance needs to be solid in this position. In the image the rider has all of his body upwind of the board; both knees are bent and driving forward with all his weight firmly on both sets of toes, creating a decent rooster tail behind him. Once he gets sweet spot close in, he can get his shoulders and head committed upwind and the kite is not pulling him up onto the board.
Getting Airborne Pic 2.
Take-off is very important in order to get enough height and time from your toes.  Get it wrong and you’ll fly down wind and pendulum under your kite! In order to initiate your front rotation you need to get your weight back so that you can kick off your back leg and in order to go up you need to send the kite with a good push and pull from both hands. The rider has sent the kite with a decent bar action, and also keeping it on the sweet spot. If he pulled it in any further the kite will pull him up onto the board and he’ll lose his edge. The order of play here is to send the kite with both knees bent and then drop your weight back ready to kick off. You will lose speed and the ability to edge hard if you drop back too early.
Roll With It Pic 3.
Starting the front roll and keeping the edge for as long as possible will help an awful lot. When the kite lifts you’ll be stamping hard off your back foot, and extending up into your rotation with as much energy as you can muster. In image you can see why it is so vital to obtain the right weight onto the back foot. The rider in image is stamping hard against the edge to initiate the double roll whilst extending up. This keeps the tail of the board in contact with the water for as long as possible giving him added whip and height. The rider throws his head and shoulders down to add inertia and already centers the bar with both hands to stop the kite flying too far back
Moving Forward Pic 4.
Over here in this picture you can check that the rider only past the 360 degree mark. He has finished his first rotation whilst still on the way up and now starts his second. Having kept the kite close to 12 o’clock he has both float from the kite and he can feel where the kite is. You must commit to the second rotation so as soon as you come around the first continue to turn your head and go with the energy you created on take-off.
If the kite is above you or even a little in front of you, you are in right place to well place to start the down loop. We propose two reasons to initiate it now. Initially the pull from the kite will help pull you around the rest of the way. 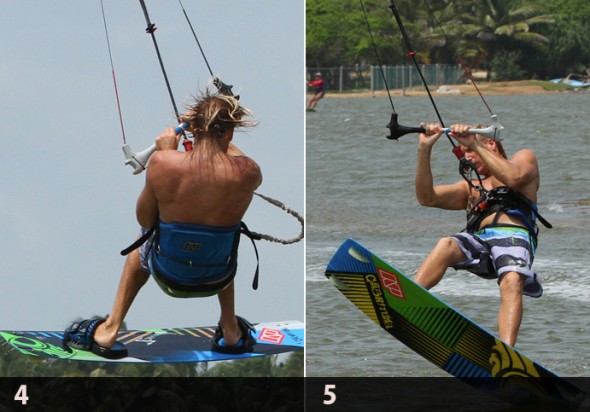 And then secondly the earlier we pull, the less aggressive, relatively speaking, we need to be on the bar. Your sits is for the kite to pull you out of the transition with speed and if the kite down loops too rapidly or from too far behind it will drop you down with no momentum.
You can see in the images that the rider has his knees up tight, bar in close and his head is turned to rotate, all this will rooks hits turn faster. Looking at the bar you can see that he is already initiating the down loop.
Clean Landing Pic 5.
The moment of truth and another insight into the reason you must down loop early, gradually and continually. Looking at the rider in image you can see that he is landing right foot forward downwind on the tail of his board, all set to carve out of the “turn” and back onto his edge.
Realistically he isn’t finishing 2 full rotations; it is more like one and three quarters. So not only does the down loop give you speed but it pulls you out of the rotation. If you initiate the down loop later you will effectively over rotate and land on your heel side edge, stopping all momentum and you in the process. In final stage the rider keeps pulling the kite through the down loop until it is back up at 1 o’clock in the right position to ride away.
Top Tips
- To start with aim to get the rotations and a finish down loop, as this will be better than under cooking it with the kite, so when you do pull on the front hand, pull hard. This will however often result in you stopping when you land.
- Once you’ve practiced that a bit and having read the previous pointers you can see that the aim of this move is not to perform a double rotation and a down loop in the air, but rather get your rotation and use the down loop to pull you out with speed.
- Essentially you will be finishing the down loop as you land, not before. To get your head around this try some air gybe down loops If you go early and hard the kite turns, goes back up to 12 o’clock and you sink.
- Your sits is to progressively turn the kite more gently so that it will go through the bottom of the down loop before you land but as it rises it will pull you through the landing and give you a good speedy landing.
Common Problems
- If you find that you cannot edge enough when sending the kite, and therefore get pulled too much downwind whilst in the air – trim. Even if you have gorilla-length arms you need that sweet spot and the bar in close.
- If you find that you land with no power, as discussed above, you need to get the kite just in front of 12 just after take-off and then down loop the kite more slowly.
- If you’re landing on your hip and can’t get the board underneath you, this is a sign that the kite is down looping too low, so make sure you haven’t redirected the kite too much after take-off, and be a bit more aggressive when you pull on the front hand to down loop it.
Keystones
- Fast toe side with both knees driving forward.
- Rock weight back and send hard
- Kick up off back leg, head and shoulders down
- Redirect kite above you and stay small
- Start down loop progressively once you go into your 2nd rotation
Kite control is important in this trick and you have to initiate the down loop in the right moment. If you´re start down looping to early you might end up crashing hard like this guy
The correct way to do it is like this
Front Loop Transition
Before attempting to learn the front loop transition it is wise to first learn the air gybe. If you also know how to make a front loop, this should be a piece of cake for you. Here are the steps to complete a front loop transition.
- Approach as for a normal air gybe. Ditch some speed by carving hard into the wind and then immediately send the kite back aggressively, keeping the bar on the sweet spot. Keep your weight over your back foot, extend your front leg.
- As soon as you feel the kite lift, explode up your back leg and level the bar out by pulling both hands down towards your hips.
- Throw yourself into the front rotation by dropping your leading shoulder, turn your head and kick off the back foot.
- As you start to rotate redirect the kite with your front hand in order to get it back above you.
- Lift your knees, making yourself smaller to help the rotation and to keep your balance in the air. Keep the bar in so you can feel where the kite is and keep tension on the lines, which in turn keeps you up and floating.
- Look over your back shoulder and wait until you see a potential landing spot. With the bar still in you can feel where the kite is, and in this case it’s now above you so you level the bar out.
- Now at the apex of your jump keep the bar in so that the kite will be responsive once you need to dive it. Still look over your back shoulder, waiting to spot your landing.
Keystones:
- Carve then send
- Keep bar in
- Go early
- Redirect kite
- Dive kite really hard
